MSW Logo
Book 3
Rose Bay High School
Activity 1 Revision of Books One and Two
Suggested answers to these exercises can be found at the end of this document.
Write procedures to:
1. Draw a red square of side 100 on a green background.
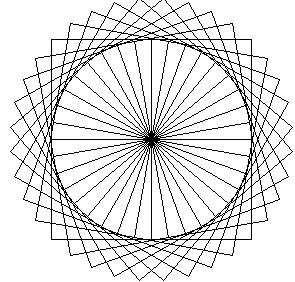
2. Spin the square in #1 around and print it every 10 degrees.
eg
3. Edit the procedure in #1 so that the size of the square is entered as a variable.
Eg to square :side
………
end
4. Use the commands first and readlist (rl) in a procedure to input three numbers and then print out their sum.
Eg to addit
Make “a first rl
………..
print :answer
end
5. Write a procedure to input the side of an equilateral triangle. The procedure will then draw the triangle.
READCHAR
Readchar performs a similar input function to readlist but only the first character (ie the “char”) is read into the variable. If the user enters a word (or sentence) only the first letter will be entered into the variable.
Converting Input to a Number
The function “FIRST” will extract the first item in a list. In the case of numerals it will convert the numeral to a number. NOTE: If you don’t use “first”, the numeral will be a character and you will not be able to carry out mathematical operations on it.
Eg.
to GetFirstNumber
make “Number1 readchar
make “Answer :Number1 * 10
home
cs
ht
label :Answer
end
Copy and paste this procedure into logo. Note if you run the procedure it will prompt you for an input (input 23). It will then output 20. If you call the procedure again it will not prompt you for an answer; however, it will out 30.
Activity 2
(the answer to this activity is in the back of the book)
Write a procedure using readchar to input a two digit number the procedure will then output the first character times the second.
Eg If 34 is input then 12 will be output.
A Logo Program Made up of Many Procedures
The following program is gambling game. The program consists of eight procedures. There are also three new commands: IF, RANDOM and SENTENCE. Look these up in HELP/INDEX and see how they are used in the program.
A Gambolling Game
TO PLAYIT
MAKE "money
1000
REPEAT 22
[PRINT[]]
PRINT
[****************************************]
GAME
END
TO GAME
REPEAT 22
[PRINT[]]
PRINT
[****************************************]
IF :money = 0
[LOSTit]
PRINT (SENTENCE [You have ]:money
[left])
BET
ROLLIT
MONEY
PRINT [Type Y to
continue]
MAKE "CONT FIRST questionbox [User Input] [Type
Y to continue]
GAME
END
TO BET
PRINT [What is your
bet?]
MAKE "bets FIRST questionbox [User
Input] [What is your bet?]
IF :bets > :money [PRINT [You
can't bet what you don't have]]
IF :bets > :money
[bet]
END
TO ROLLIT
PRINT [Give me a number
between 1 and 6]
MAKE "num FIRST questionbox [User
Input] [Give me a number between 1 and 6]
IF :num < 1
[ROLLIT]
IF :num > 6 [ROLLIT]
END
TO MONEY
MAKE "rand RANDOM
6
MAKE "rand :rand + 1
IF :num = :rand [WIN]
LOSE
END
TO LOSE
PRINT SENTENCE [It was a
]
:rand
MAKE "money :money -
:bets
END
TO LOSTit
PRINT [Thats it your
broke]
repeat random 22
[PRINT[Broke]]
STOP
END
TO WIN
PRINT
[****************************************]
PRINT (SENTENCE [You win it was a
] :rand)
PRINT
[****************************************]
MAKE "money :money +
5*:bets
END
Activity 3
1) If you have not done so already open the Intranet copy of this document.
2) Use copy/paste to enter the gambolling program into MSWlogo’s editor.
3) Run the game to see how it works. (It is best to maximize the commander window).
4) Now make changes to the program such as:
· Starting money.
· The sides on the dice (ie 6 sided to 10 sided)
· The odds paid for a win
· Screen Messages
· Etc
5) Bold and underline the changes you have made and print out your program.
Looping, Recursion and Conditional Branching
The previous program and the shell program in Book two used looping and recursion. We will now look more deeply into this.
Looping
The most common method of looping is with REPEAT.
Eg to square
:size
Repeat 4 [ fd :size rt 90]
End
The procedure below will draw ten squares of increasing size.
To grow
Make “size 10
Repeat 10 [square :size
make “size :size + 10]
End
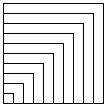
The WHILE loop is also very useful. The procedure below produces the same result as the previous one.
to growit
make "size 10
while
[:size < 100] [square :size make "size :size + 10]
End
Recursion
Recursion occurs when a procedure calls itself. This is a very powerful way to program loops.
The procedure below uses recursion however there is no way to stop it except for clicking HALT.
To grow :size
Square :size
grow :size +
10
end
We can stop recursion by using a while loop
To grow :size
while [:size < 100]
[Square :size grow :size + 10]
end
Recursion and Conditional Branching
Another way to stop recursion is to use the condition branch IF.
To grow :size
If :size > 100
[stop]
Square :size
grow :size +
10
end
Activity 4
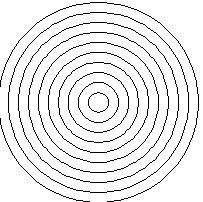
Use the library function CIRCLE radius to draw the circles in the following:
1. A program to draw 10 concentric circles without using recursion.
2. A program to draw 10 concentric circles using recursion.
Multiple Turtles
We have used multiple turtles before in book two, in this section we will use them to draw interesting patterns. The command setturtle is used to refer to the different turtles.
First we will write a procedure to set six turtles up each pointing at angles 10, 20, 30, 40, 50 and 60 degrees to the right. We will use REPCOUNT to refer to each of the turtles.
note repeat 6 [type repcount] will return the numbers 1 2 3 4 5 6
So our procedure will be:
To setup
cs setpensize [10
10]
repeat 6 [setturtle repcount-1 rt
10*repcount]
end
We now want to make the turtles draw a spiral. A procedure to draw a spiral is:
to spiral :side :angle
if :side > 300
[stop]
fd :side rt
:angle
spiral :side
+ 4 :angle + 0.1
end
Try it by calling spiral 5 90
We need to change this so that all six turtles draw a spiral.
TO SPIRAL :SIDE :ANGLE
IF :SIDE > 300 [STOP]
repeat 6 [setturtle
repcount-1
setpencolor 15-2*repcount
FD :SIDE RT :ANGLE ]
SPIRAL :SIDE+4 :ANGLE+
0.1
END
Try this now and type spiral 5 90.
Activity 5
1. If you have not already done so enter the two procedures setup and spiral into the editor.
2. Run the procedures. The following give some interesting results:
· Setup spiral 5 90
· Setup spiral 2 150
· Setup spiral 3 60
3. Now make some changes to the procedures. Some changes could include:
· The pen size (setpensize).
· The increments on side (+ 0.5) and angle ( + 0.12).
· The angle (10) in setup (rt 10*repcount).
· The number of turtles.
· The pen colours and background colours.
· Use * in the angle increment eg :angle * 1.02
Print out both your procedures with the changes highlighted and also print out the pattern produced.
Activity 6
The Chaos Game
Rules
1. Select a triangle ABC.
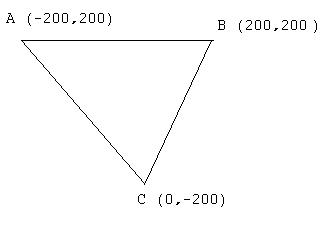
3. Now starting from the middle of the triangle select a vertex at random.
4. Move half way towards it and draw a dot.
5. Keep on repeating steps 3 and 4.
The LOGO program below will do this for you and you will be amazed with the result!
Please note that you must click HALT to stop it.
The Chaos Game
to start
ht
chaos 0
0
end
to chaos :x :y
make "z random 3
make "z :z + 1
if :z=1 [A]
if :z=2 [B]
if :z=3 [C]
chaos :x
:y
end
to A
make "x (:x-200)/2
make "y (:y+200)/2
pu setx :x sety :y
pd fd 1 bk
1
end
to B
make "x (:x+200)/2
make "y (:y+200)/2
pu setx :x sety :y
pd fd 1 bk
1
end
to C
make "x (:x)/2
make "y (:y-200)/2
pu setx :x sety :y
pd fd 1 bk
1
end
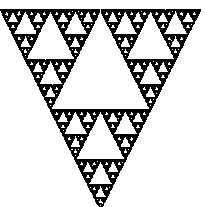
Exercises
1. Use COPY/PASTE to load the program into LOGO.
2. Run the program (Call the procedure START). PUSH HALT TO STOP IT.
3. Now make the following changes:
· Have the program ask for the coordinates of each of the points A,B and C.
Print out your new program with the changes highlighted.
· What happens when you use four points?
Try it and print out both the program with the changes highlighted and the bitmap.
Activity 7
Controlling Your Program with Buttons
MSW Logo allows you to create 'buttons' to call procedures. The process is quite complex, but you can use the example provided in the Help section and simply modify it to suit your own requirements.
1. Follow the following instructions
• Open MSW Logo
• Go to the Help menu
• Select Index
• Type in "buttoncreate"
• Click on Display button
• Select the section of text (all five lines) from the top example starting with: windowcreate and ending with windowdelete.
• Select Edit/Copy and copy the text (or Ctrl/C)
• Put away the Help window
• Click in the Input Box
• Type in <edit "buttons>
• Put your cursor at the end of "to buttons" in the edit window.
• Press Enter
• Go to the Edit menu
• Click on Paste (or: Ctrl/V)
• Insert a semicolon (;) at the beginning of the line starting with <click left or right...>
• Insert a semicolon (;) at the beginning of the line <windowdelete "mywindow>
• Close the Help/Edit window
• Save the Edit window Contents
• Click in the Input Box
• Type in <buttons>
• Press Enter
Experiment with the program until you understand what it is doing.
Insert your own procedure into the square brackets at the end of each line.
NOTE: To close the window, type <windowdelete "mywindow> at the Input Box.
2. Use COPY/PASTE to enter the following procedure into LOGO.
to ButtonExample
; This procedure shows how to use
buttons for control of your programs
; NOTE: Button and Window co-ordinates
are: Horiz position, Vert position,
width, height
windowcreate "main "mywindow "mytitle 0 0
100 100 []
buttoncreate "mywindow "myleft "left 25 25 25 25 [FD 50 LT 45]
buttoncreate "mywindow
"myright "right 50 25 25 25 [FD 50 RT 45]
; The window is 'closed' with
: windowdelete "mywindow
end
Again experiment with the program until you understand what it is doing.
3. Write a program of your own which uses buttons for control. Print out your program.
Activity 8
Now write two programs of your own consisting of at least two procedures each to produce a pattern. There are many more commands than the ones I have introduced to you. You may care to look these up in HELP/INDEX. I have included some very short procedures in the appendix which may also help you. Advanced users may want to enter perspective mode and program in 3D!. Print out both your procedures and the patterns produced.
APPENDIX
Answers to Activity 1
1. to
square
setscreencolor
2
setpc
14
repeat
4 [fd 100 rt 90]
end
2.
to
spin
repeat
36 [square rt 10]
end
3.
to
square :size
setscreencolor
2
setpc
14
repeat
4 [fd :size rt 90]
end
4.
to
addit
make "a first
rl
make "b
first rl
make "c first
rl
make "d
:a + :b +
:c
print
:d
end
5.
to
triangle
make "side first
rl
repeat
3 [fd :side rt 120]
end
Answers to Activity 2
to
activity2
make "Number1 readchar
make "m readchar
make "Answer :Number1 * :m
home
cs
ht
label :Answer
end
Some Examples You MAY Like To Try